Blogg

Blogg

onsdag 15 december 2021

Icy Snowflakes

Hello and welcome, 

Today I will share a card that I have made using the beautiful 3D snowflakes from Tim Holtz. 

I started with the background and cut a piece of Distress Kraft heavystock and then inked my CMS358 Advert stamp with Distress embossing ink, then I used white embossing powder and heat embossed. I inked the edges with Distress ink Ground espresso and used a thin black pen and made a frame. 
I diecut the snowflakes from Sizzix 3D Impresslits snowflake and put on some white Grit paste and Distress rock candy glitter for a icy effect. I also used some pearls to put in the middle of each snowflake. 
Then I took a piece of Christmas Ideaology ephemera and inked the edges, then used frosted crystal embossing powder on it. 
I used a piece of string, a Ideaology pinecone and some greenery die cut from Sizzix 661597, Tim Holtz Holiday greenery mini. 
I mounted the card on a piece of white cardstock, then a cardboard card and finally to a white card blank. All edges inked with Ground espresso Distress ink and with 3D adhesive between the background and white layer for dimension. 
I will try this card over at Simon says stamp Mondaychallenge - Cold as ice.

Hope you are having a great time preparing for Christmas, 

Have a nice day and thank you very much for visiting me today! 

/ Susanne


onsdag 17 november 2021

Father’s day card

Hello everyone, 

Last Sunday we celebrated Father’s day here in Sweden. I am fortunate to have my Dear Father alive. I made him a card using Tim Holtz products.

I started with the background, cut a piece of Distress White heavystock and used Frayed Burlap Distress ink on my craft mat. Spritzed with water and dipped the card, drying between layers and repeated until happy. Then I inked the edges with Ground espresso and Walnut stain Distress ink. Used my sewing machine around the edges for the stitching. 

Next step was the stamping with the numbers. I placed my background card in my Tim Holtz Stamp platform, inked the number stamp from CMS432 Inquisitive with Barn door Distress Oxide ink, then cleaned the stamp with water and inked it with Black soot Archival ink and stamped above the red stamped numbers. I love this look and I have learnt it from one of Emma Williams tutorials. (Click the link to her post). Then it was time for the blue numbers. I did it the same way with the blue as with the red, but with Prize ribbon Distress Oxide ink. Then I moved the stamp and repeated the same process a couple of times. Next I used the text stamp from CMS328 Entomology and Black soot Archival ink, and stamped randomly without a stamping block. 
Next up was the “panel” with the “Best Dad ever” text. I cut a suitable piece of Distress White heavystock and inked it the same way as the background accept from the numbers. Then I placed the panel in my Stamp platform and masked the letter “y”, on the stamp “Best day ever” and inked it with Distress Oxide Prize ribbon, took away the making tape and then stamped. Then I moved the stamp so the “D” in day was placed directly after the letter “A”. In that way I got the word Dad instead of Day. After I stamped with Oxide I used Distress embossing glaze Prize ribbon on top and then heated. 
I inked the edges of the panel with the same inks as on the background and then stitched the edges with my sewing machine. 
The image with the man and bullseye are also from CMS432 Inquisitive set. Before I stamped the bullseye I “inked” it with Frayed burlap the same way as mentioned above for the background. Then I stamped it the same way as the numbers. The black dots are from the same set, stamped with Black soot Archival ink. I colored the man with Distress ink and reinkers, cut him out, inked the edges, and mounted him to the bullseye with 3D adhesive. Behind the bullseye I glued a star trim border, cut from a Sizzix 3D impresslits. The border is cut from sanded Metallic Kraft stock, and then I used Distress crayon Walnut stain to grunge it up a bit. 
Then I used the 665205 Alphanumeric bold dies and cut out “Pappa”, which means “Dad”, from the background. Inked the edges and glued a piece of sanded and inked Metallic Kraftstock behind. This idea I took from the very talented Vicki Evans, (click link to her blogpost). Then I splattered some Distress mica stain in Crooked Broomstick on the card. The red stars are from Tim Holtz ideaology, which I have painted in red acrylic paint and then painted over with a wash of brown acrylic paint. 
The Thought token is also from Tim’s ideaology. I painted it the same way as the stars above and then I used Distress crayon in Antique linen Distress crayon over the text, then used a piece of lightly damp paper to remove the access. I used a long fastener (which I have colored with Alcohol ink in Mushroom) to mount the token to the card. 
I mounted the card to a piece of dark blue cardstock, then to a cardboard piece which I have inked the edges on with Ground espresso Distress ink. Then I mounted them to a dark blue card blank. I used 3D adhesive between the card front and the second layer for dimension. 


I hope I have inspired you to make a card. I think this stamp set are perfect for men’s cards. 

Have a nice day, and Thank you very much for visiting today.

/Susanne

söndag 24 oktober 2021

The Count - Elixers & Potions

Hello and welcome, 

I have made a tag for Halloween with Tim Holtz products. 

When this die of the Count was released I was sure I needed him. He is such a cool dude🧛🏼‍♂️.

We don’t celebrate Halloween much here in Sweden but I love making Halloween projects, and every year I carve a pumpkin and place it outside our house with some candles inside. 🎃🍁🍂.

Now to my tag;


I started with a Mini etcetera tag and cut a piece of Design paper from the Ideaology ”Abandoned” stack. I glued it to the tag with Distress collage medium. Let dry, then sanded the edges and inked them with Ground espresso Distress ink. 

Then I stamped a text stamp from CMS138, Apothecary, with Distress embossing ink, and heat embossed  with white embossing powder. Next was the stencilled area to the right, using stencil THS147 Deco arch and Distress texture paste matte opaque. Let dry. On the edges I put Distress crackle paste on random places, let dry. I used Distress crayons on the crackle and smeared it out with my fingers and for the last finish I used my watercolor brush. Finally I splatted some Crooked broomstick Distress mica stain over the background. 

I used Distress white heavystock for all the diecuts, then I colored them with Distress inks and Distress mica stain sprays. I used Sizzix dies, 665557 The Count and 663092 Laboratory. For the small label I used an old Bigz die, 657188 Tiny tabs & Tags, and stamped it with the small text from CMS120 Little labels.  Added it to the shelf with a jump ring. After I have glued all pieces together I inked all the edges with Walnut stain Distress ink. 
I diecut the shelf’s 3 times extra from black cardstock, glued them together to get some more sturdiness and thickness. I stamped the number “150” on the purple “bottle” with a stamp from CMS412 Examination.
I sanded a Quote chip Halloween and inked the edges with Walnut stain Distress ink, them I embossied it with Frosted Crystal embossing powder. I drilled two holes in it with my Mini dremel tool and used steel wire and wrapped it around the tag. Then I used Antique linen Distress crayon over a Story stick, removed the access and fastened it to the steel wire with a charm clip. I took a Bity bat and added some Ground espresso Distress crayon on it, and glued it sitting above the Quote chip. I colored a piece of seam binding band with the new Distress color Villainous potion and made a bow for the top of the tag. 


The ledge is an Etcetera trim which I painted with white gesso and sprayed with Distress Mica stain spray Empty tomb, then I stamped over it with CMS412 Examination and Archival ink Black soot. I glued the “web” Etcetera trim to another straight trim for extra dimension. The edges is inked with Distress ink Walnut stain. I inked some Mummy cloth with Walnut stain Distress ink and glued it above the ledge. Then I used some Distress crayon Walnut stain on two bones and on the Creepy eye. Glued them on to the Mummy cloth. I used Alcohol ink in Mushroom on a Ideaology spider and mounted him to the ledge with a jump ring. All metal Ideaology pieces on this tag is colored with Alcohol ink in Mushroom. 
I used a clipping sticker Halloween with inked edges in the lower right corner of the tag. 


I will try this tag in the challenge over at Simon says stamp Monday challenge - Spooky/ Halloween. 


Thank you very much for visiting my blog today, I hope I have been able to inspire you, 

/ Susanne


tisdag 19 oktober 2021

Villainous potion pumpkin

Hello and welcome, 

Today I have had a day off from work, so what better way then to spend it in my craft room. First I went to my local craft shop and picked up the new Distress color, Villainous potion. I’m not a “ purple” person but this color is fabulous. So rich and dark. 

I made a tag with inspiration from the very talented @igirlzoe, click here for her blogpost. I have used Tim Holtz products.


I started with the background and cut a tag from White Heavystock. Then I used THMS064 skull stencil with Distress texture paste opaque, and let dry.


Next I inked my craft mat with Frayed burlap Distress ink and spritzed with water. Dipped the tag, heated and repeated until happy. Then I did the same with Villainous potion Distress ink. I spritzed some Hocus pocus Distress mica stain on the background as well. I stitched the edges with lilac thread using my sewing machine. Finally I inked the edges with Villainous potion and Walnut stain Distress ink.


I stamped the background with stamps from CMS435 Rest in peace, with Distress ink in Villainous potion. The candles are from the new Sizzix candlelight set, cut from White heavystock and colored with Distress inks. All the edges on the diecut are inked with Walnut stain Distress ink. 


The pumpkin is also diecut from White heavystock with Sizzix die Pumpkin patch, colored with Distress ink in Villainous potion, Antique linen, Distress Oxide Shaded lilac and Hocus pocus Distress Mica stain.


On the darkest pumpkin I also used Frosted crystal embossing powder for the frosted and cool look.


I used Collage medium as glue for all glueing on this tag.


I finished the tag off with some Villainous potion colored seam binding band, and tied a bow. 

I will try this tag in the challenge over at Simon says stamp Monday challenge - Spooky/Halloween.

Products used:
Dies: 656938 Tag & Bookplates, 665552 Candle light, 665556 Pumpkin patch
Stencil: THMS064 Skulls
Stamps: CMS435 Rest in peace
White heavystock, Distress texture paste, Distress embossing ink, Ranger Frosted crystal embossing powder, Ditress inks, Distress Oxide, Distress Stain mica spray

Hope you all will have a great week, and possibility to spend some time crafting.

/ Susanne 


torsdag 14 oktober 2021

The Florist

Hello and welcome, 

Today I will show a Halloween card! I really love the Halloween making season! I have used Tim Holtz products for this card.

Let me introduce you to “The florist”. 


I started with the background, a piece of Watercolor cardstock. Then 
I inked my craft mat with Frayed burlap Distress ink, sprayed with water and dipped the background. Heated with my heat tool, then repeated until happy. Then I used Tim Holtz stencil, the THS110 Shifter diamond, with Black soot and a Rusty hinge Distress ink, and spritzed with water and let react for a short while, to get a softer look. Then heated. Next stencil, THS149, Script with Frayed burlap Distress ink. Then I used stamps from CMS138 Apothecary and CMS435 Rest in peace with different Archival ink colors, Sepia, Black soot and Plum. I inked all the edges with Ground espresso Distress ink.


I also stamped the spiderweb from CMS346 Tangled web with Distress embossing ink and embossed with Black powder. I draw a frame around the whole background with a thin black pen. I “splatted” some Distress Mica stain in Croocked broomstick to the background as well. I decorated with a Tiny clip.


Now it’s time for the main person of this card, “the florist” herself. First I stamped the flower from CMS413 Dearly departed on watercolor paper, then I masked the flower and then stamped the skull from CMS435 Rest in peace. I colored the whole image with Distress inks, and fuzzy cut it. I put some orange Stickles glitter glue to the middle of the flower. She also have a idea-ology Creepy eye, which I have grunted up with some Distress crayon Walnut Stain. I adhered her to the background with 3D adhesive. 


I stamped and embossed a spider under one of the flower stems with black embossing powder, as if it was hanging under the stem. I made a label from Distress White heavystock, inked with Frayed burlap ink, stamped and embossed with CMS412 Examination, and black embossing powder. I wrapped the label around all layers of the card. Here you can see some of the Mica Stain “splotches” as well. 


On the other side I used the “florist” stamp from CMS413 Dearly departed and made a similar label, on the exact same way. Also wrapped around all the other layers. I inked some Mummy cloth with Walnut stain Distress ink. I decorated with a Typed token Halloween which I have used Antique linen Distress crayon on to get the text more visible. I fastened it with a loop pin. 


On the other side I glued two pieces from Clipping stickers Halloween, with Distress collage medium. I have inked the edges of the stickers with Walnut stain Distress ink. 


I used a hexfastener in the upper right corner, for decoration. Here you can see some of the Mica stain splotches. 
I mounted this card to a sanded “Blackout” panel, then a piece of inked cardboard, finally to a black card blank. All layers with 3D adhesive in between for dimension. 


I will try this card over at Simon says stamp Monday challenge - Fall colors mood board. I have been inspired by the colors. 

Thank you very much for visiting today, 

/ Susanne 


måndag 27 september 2021

Simons Says Stamp Designer spotlight - week 4 - Touchy Feely (Add Some Texture)

Hello and welcome, 

It´s time for another challenge over at Simon Says Stamp Monday Challenge blog, and it´s is my fourth and last week in the Designer Spotlight. Time flies:)

I am really proud and so thankful for all the positive feedback and congratulations I have received from so many talented people. Thank you very much to everyone, and of course for the opportunity to contribute in this.

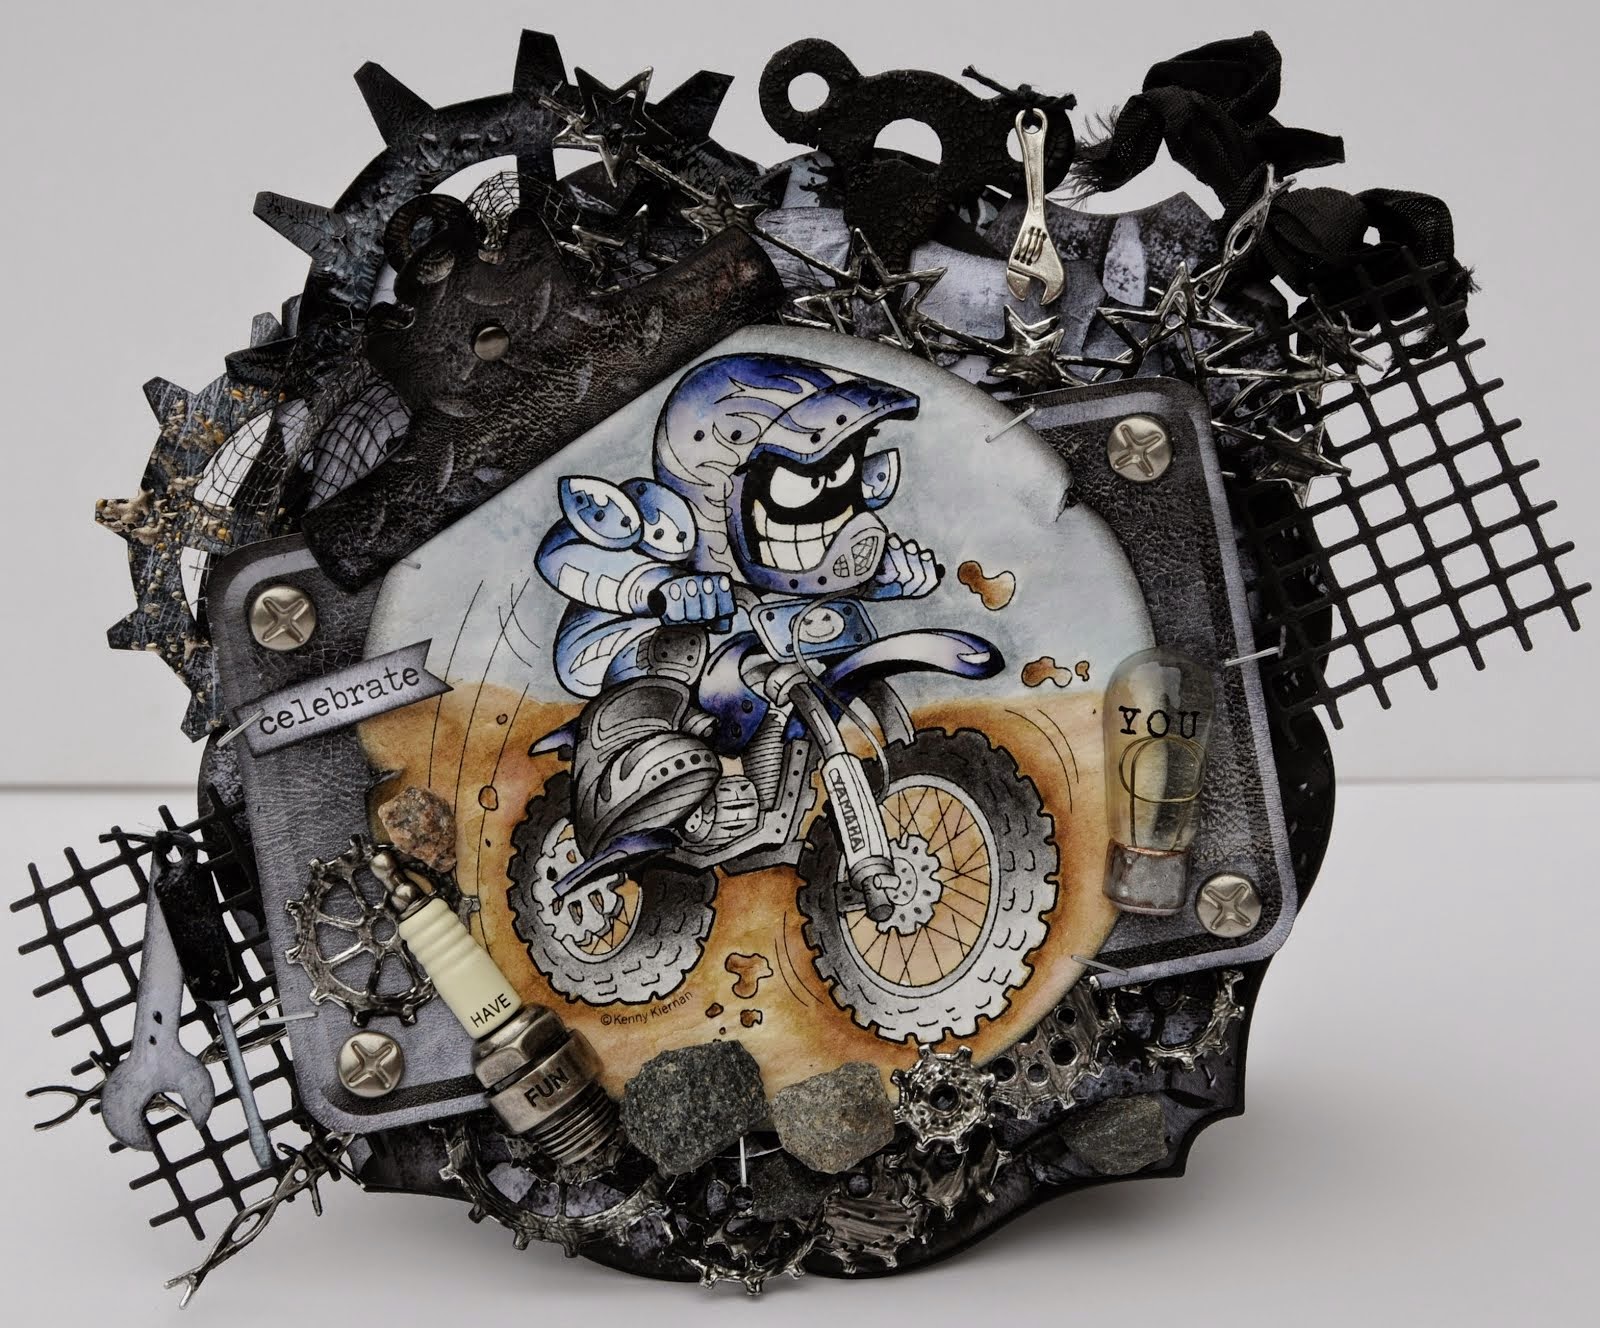
This weeks challenge is Touchy Feely (Add Some Texture).

I started with the background by cutting a piece of watercolor paper (using the textured side) and used the stencil THS129 with texture paste to get the base for the lower part of the card. It was left to dry for  a while. After this I used Distress spray stains and let dry again. Now it was time for the moon for which I used Distress ink Antique Linen applied as a circle then I took Tim Holtz Moon mask and covered it. 
For the blue part of the background I used Distress inks in different blue shades, then spritzed with water and heat dried.
For the second piece of the moon mask I used gray color. I stitched around the edges with my sewing machine and inked with Walnut stain Distress ink.


For the texture I mixed Distress texture paste matte with Black soot Distress reinker to get the paste dark. Then I used the paste through some stencils. (The bats, the "Halloween-text" and the spider.)

For the spider web I used a stamp and Black soot archival ink. The bat is die cut from the new Pumpkin patch set from white paper and then inked with Distress inks. I also splattered some Distree paint in Black soot with my splatter brush on the backround and some small splats from Tim Holtz Mica stain Empty tomb. On the moon I used some small splats from Mica stain Crocked broomstick.

The pumpkins are die cut from White heavy stock and inked with different color of Distress inks, spritzed with water, heated and inked the edges. To get som extra texture on the pumpkins I used Frosted Crystal embossing powder.


For the sign at the bottom I cut a piece of Metallic Kraft stock, sanded and inked the edges. This was topped with a white piece on which I stamped the text and embossed it black.

I glued two Hardware heads, on which I have used Alcohol ink in Mushroom to get the worn look.

I layered the card on sanded and inked Metallic Kraft stock next sanded Black Kraft stock and finally inked cardboard for some extra texture. 3D foam between the layers.


We are hoping you will join in the challenge this week, it would be lovely to see you there and as always, there is a $25 gift voucher for one lucky winner to spend. 

The products I used are listed below;


Dies: Tim Holtz Pumpkin patch  
Stamps: Tim Holtz  Tiny textTangled webs
Distress spray Stain: Peeled paintIced spruceBlack soot
Ranger Embossing powder Black super fine
Distress Embossing powder Frosted crystal
Distress reinker: Black soot
Distress paint: Black soot
Archival ink: Black soot
Alcohol ink: Mushroom
Distress texture paste: Texture paste
Ideaology:  Hardware head


Thanks for visiting my blog, I hope I have inspired you. Welcome back.

/ Susanne


måndag 20 september 2021

Simon Says Stamp Designer spotlight - Week 3 - Stitch it

 Hello and welcome, 

It´s time for another challenge over at Simon Says Stamp Monday Challenge blog, and it´s is my third week in the Designer Spotlight. Time flies:)

I am really proud and so thankful for all the positive feedback and congratulations I have received from so many talented people. Thank you very much to everyone, and of course for the opportunity to contribute in this.

This weeks challenge is Stitch it.

So with that said, let´s start with my substrate and background. I took a Mini etcetera tag and cut some Distress Cracked leather cardstock. Sprayed it with some Distress ink´s, Distress spray stains and Oxide sprays in different colours. Then I sprayed alayer of Distress ink refresher on top. I inked the edges  then stitched around with my sewing machine. I also stamped with Archivl ink, a stamp from CMS397, Faded types. Then I glued my background to the Etcetera tag with Distress collage medium matte. 


I made two small metallic pieces as decoraation, using the Foundry 3D folder and some sanded metallic Kraft stock. then I added some Distress paint in Salved patina on top. I glued two hardwear heads to the metallic pieces and added some Alcohol ink in mushroom on the heads. I used a piece of Salvaged patina inked Linen ribbon on top of my tag.


I then made a smaller tag from Mixed media heavystock and used Tim Holtz Eroded metallic technique. You can find this technique in his Creative Chemistry classes or on his page from some of his fabulous live demos. I added some Translucent Grit paste on some random places on the tag than used some Distress Crayons on top to get that "rusty crusty" look. Mounted a piece of Salved patina inked string on top. Then I diecut the "number 3" from that tag to use as decoration. Inked the edges with Ground Espresso and Walnut Stain Distress inks. Then I sanded a Milk cap and inked the edges, also for decoration. I used a Ideaology Tiny clip on the tag as well.


Then I took a Ideaology Stencil card, (I love these cards), inked the edges and also stitched on random places with my sewing machine. I coloured a gruop of girls from Ideaology Paperdolls groups with different colors of Distress crayons. Glued some Transparent wings of their backs. I stamped "believe in the magic" with CMS394, Tiny text, with Distress Embossing ink, and used White Embossing powder on sanded Black Kraftstock. Mounted the "no3", the girls and stamped words using 3D foam for dimension. 


Here you can see details from my stitching and "rusting". 


Down in the left corner I made a small "cluster" of decorations. First I used a Ideaology ruler from Odd+Ends and "rusted" the same way as mentioned above. Then I made a heart from mixed media heavstock, The Faceted heart die, some Distress inks, sprays and Distress paint Salved patina.  Some Rusty hinge spray on top. Then I added a Quote flair. 


That was the description of this tag. I hope I have inspired you to make one yourself. 


We are hoping you will join in the challenge this week, it would be lovely to see you there and as always, there is a $25 gift voucher for one lucky winner to spend. 

The products I used are listed below;


Dies: Tim Holtz  Countdown, Faceted heart (sorry, can´t find it in the shop but you can use another decoration)
Stamps: Tim Holtz Faded typeTiny text
Embossing folder: Foundry 3D
Distress Oxide spray: Frayed burlapSalvaged Patina
Distress spray: Rusty Hinge
Distress Embossing ink
Distress Paint: Salvaged PatinaBrushed Pewter
Distress Crayons: Set 1Set 2Set 3Set 10Set 11Set 12
Archival ink : Jet black
Alcohol ink: Mushroom
Embossing powder: White


Thanks for visiting my blog, I hope I have inspired you. Welcome back.

/ Susanne