Blogg

Blogg

söndag 23 december 2018

Merry moose card


Hello again,

Another Christmas card, with Tim Holtz products.
First time I saw the Merry moose die I knew I was going to buy it. He is so cool.


I started to make the background with Distress oxide in Stormy sky and Chipped Sapphire. I cut out a mask with a round die for the moon and masked it off. Then when I was ready with the sky I took away the note and used the negative diecut as a mask and used Mustard seed and Wild honey Distress oxides. Spritzed the two colors with water for some more interest. Then I used one of Tim´s stencils for the snowflakes and used opaque texture paste and put some Rock Candy glitter on it before it dried.


I handcut the snowdrifts and used glossy accents and clear rock candy glitter on them.

I diecut the trees and the moose from Kraft cardstock that I have sanded for the distressed look. On the trees I also used Glossy accents and Clear rock candy glitter. A great tip I learned from the talented Paula Cheney in a class at the very nice shop Whimsodoodle in St. Petersburg Florida on my vacation. It looks like frosty trees! 


I distressed the edges of the moose with Walnut stain Distress ink.

I stamped the texts with two different stampsets, CMS323 Holiday postmarks and CMS357 Festive overlay, embossed with black embossingpowder.


The "Happy new year" stamp is matted on a tree plank piece which are diecut with the Planks die and embossed with the 3D embossing folder for that woodplank look, colored with different colors from Distress oxides. 

The card is matted on a panel from the Tidings Design paper stack. 

Thanks for visiting and Merry Christmas!

/Susanne


Deer Christmas card

Hello and welcome,


I want to share a Christmas card that I´ve made. I have been away on vacation and had the possibility to find some new Tim Holtz products. I have used some of them on this card.
I started with the background and used old paper Distress Oxide on Distress Heavystock. Then I stamped CMS360 Inventor 6 and gold embossing powder. I also stamped the background with he text stamp from CMS328 Entomolgy. After that I used Distress ink in Walnut stain and gold foil on the edges. I matted that card with two different Design paper-Tidings panels. 


The smaller panels are Kraft stock metallic, Designer paper-Tidings and then I made a red panel with different colors of Distress ink and embossed the "Paramount" stamp from CMS066 Mini Holidays set with white embossing powder. I like that stamp a lot.

I die cut the deer with Tim´s new die Cool Yule, from Kraft cardstock and Designpaper-Tidings.
The glasses are diecut from Kraft metallic paper in gold. I used Grit paste as snow on the deer´s head, antlers and scarf.


GOD JUL is Swedish and means Merry Christamas. I used the Deco die from Tim Holtz Sizzix for these letters. I´ve wanted this die a very long time and now it has been given to me buy my husband :) I love that font!

The small black "air mail" stamps are from CMS323 Holiday postmarks.


I also used Tim Holtz splatter brush and white acrylic paint to get the "snowy effect" on the background aand on the letters.

I finished the card off with some black hemp thread and an ideaology Adornments Christmas. Also a hex fastener in the top right corner.

I used some gold acrylic paint to change color on the Ideaology pieces.

I mounted this card on a black cardpanel and distressed the edges with Picket fence Distress ink.

Merry Christmas and a Happy New Year.

Thanks for visiting, 

/Susanne


tisdag 23 oktober 2018

Halloween card

Hello,

Today I will share another Halloween card.
The background of this card is made using Tim Holtz Planks die and 3D embossingfolder Lumber on Distress Media Heavystock. I started to diecut some planks and then used the 3D embossingfolder to get the texture. Before I embossed the plank pieces I inked one inside of the embossingfolder with Jet black Archival ink to get the ink down in to the texture. After embossing I used Distress Oxides in different brown tones to get the wood color.
Then I mounted the planks together with tape and som 3D adhesive. After that I diecut the clawmarks from Tim´s Sizzix die Clawmarks.


Behind the clawmarks I mounted a piece of Tim Holtz Design papers from the Regions beyond stack. There you can see the face of a lady who have been missing for a while...


For the Halloween text I have used Tim´s technique stamping, with stain, instead of stains I used Distress sprays in Carved pumpkin, Black soot and Wilted violet, then stamped with Picket fence. Stampset CMS138, Apothecary from Stampers Anonymous.


Under the Halloween word I placed Drip edge diecut from Tim´s Sizzix die Drip edge. I cut this from Kraft cardstock in red and sanded, then used some Glossy accents above.
Also some cheesecloth coloured with Carved pumpkin Distress spray and Black soot Distress ink.

 In the left corner I placed an Ideaology clip and owl. The owl and clip are coloured with some acrylic pants and I used Stickles glitter in red for his eyes.

 For the sentence I used some Halloween clipping stickers.


Challenges:

Craftstamper - TIMI - challenge, Anything goes
Simonsaysstampblog - Mondaychallenge, Halloween/Spooky

Thank you for visiting,

/Susanne


onsdag 17 oktober 2018

"Deer-Santa"

Hello and welcome,

Last weekend I went to a crop and received some new Tim Holtz, Stampers anonymous stamps that I have ordered. I decided to make a Christmas card so I started with the set Yuletide CMS356 and the stamp with Santa. And I couldn´t resist, what if I put the deer´s head on Santa´s body? Then I was hooked!


I masked the stamps together, and colored him with Distress inks.
For the background I used Distress Mixed media Heavystock and Distress Oxide in Old paper. Then I stamped the Advert stamp from CMS358 and embossed it with embossingpowder in gold for an old and vintage look. I also stamped the textstamp from CMS328 Entomology with Walnut stain Distress ink. I mounted the background on two different designpapers from Tim Holtz Tidings stack, then on black Coredinations cardstock as a base. All inked with Distress ink Walnut stain on the edges.

 I diecut some houses with Tim´s Sizzix die, Cityscape Metropolis, from Coredinations cardstock and sanded for a distressed look.


I used a Ideaology Tiny bell and a string for decoration.


I used Grit paste on the roofs as snow.


  I used two stamps from the CMS323 Holiday postmarks as "decorations", stamped on designpaper with embossing powder in gold. I mounted the two pieces with 3D tape for dimension.


I also put a Ideaology Hexagon fastener in the top right corner.

I think the "Deer-Santa" looks so proud and satisfied when he leaves the city after he has given away all the Christmas gifts . He´s got so much authority. lol.

I will try this card in this challenge: 


Thanks for visiting, 

Have a nice day, 

/Susanne


torsdag 11 oktober 2018

Theories card

Hello,

Today I will share a quite simple card, but a card I really enjoyed making.
For the background I used Distress Oxides in Walnut stain, Vintage Photo, Broken china and Stormy sky.
I used a Tim Holtz Sizzix die to cut out the numbers on the left. I saved the star from the diecut and put that on the balloon with a 3D sticker. I stitched around the panel with my sewing  machine.

I used one of Tim Holtz Stampers anonymous stamp set, Theories, CMS 329. I stamped the image and text with Ranger embossing ink, and used black embossing powder, and heated.

I mounted the card on another "background" made with Tim Holtz 3D embossingfolder - Mechanics. I used black cardstock, embossed with the folder and colored it with Distress crayons in Stormy sky and Spiced marmalade. Then I mounted it on a black card.

 On the bottom of the image I used Seth Apthers Baked texture embossing powder - Rocky road for some extra texture. 

 Look at the 3D effect from the embossingfolder! Impressive.


And look at the chunkiness from the Rocky road embossingpowder.


 I will try this card in this challenge:


Thanks so much for visiting!

Have a nice day!

/Susanne

lördag 29 september 2018

Framed pumpkins

Hello,

Now it´s time for one of my favorite seasons when it comes to crafting, Halloween!
Even though we don´t celebrate Halloween in a big manor in Sweden I like it a lot!

I started with the background, cut a piece of Distress mixed media Heavystock, and used Tim Holtz technique called stamping with stains. Instead of using Distress stains on the background I used Distress spray stains in Carved pumpkin, Wilted violet and Black soot. For the stamping I used Distress stain in Picket fence and my stampset CMS306, Skulls and cobwebs from Stamper anonymous. I did some sewing with my sewing machine as well.

On the background I added some pieces of designtape on random places. Then I mounted it on some lilac cardstock and then on a piece of designpaper from the Dapper stack. I distressed the edges on the Dapper paper with Carved pumpkin Distress ink. Then mounted on a black card blank.


For the decoration I used one of my favorite stamp sets from Stampers anonymous, pumpkinhead CMS309, colored them with Distress inks in different colors. I used Black diamond Stickles glitter in their eyes. Then I fuzzy cut them and put them on some cheese cloth which was colored with Distress stain in Carved pumpkin and Black soot Distress ink. 
The frame is Ornate frame die from Sizzix Tim Holtz. I put Grit paste on the frame and then Distress spray stains in the same colors as on the background. Then I used some Distress crayons in the same colours and finally added some Distress crayon in Antiqued bronze. 


 In the right corner I used some Clipping stickers - Halloween.


The number 31 is cut out from a Sizzix Tim Holtz Sizzlits decorative strip - Spooktacular and mounted with some 3D tape for dimension.

The small label is a die cut from Sizzix Tim Holtz die Tiny tags and tabs, stamped with the number from the postage stamp set from SA. I used Black diamond Stickles glitter around the label, and mounted it with an Ideaology jumpring. Here you can see the designtape as well.


In the lower right corner I used black modelling paste through a Tim Holtz mini stencil.

This is my first Halloween card for the season, I hope to make many more.

Thanks for visiting, 

/Susanne


söndag 23 september 2018

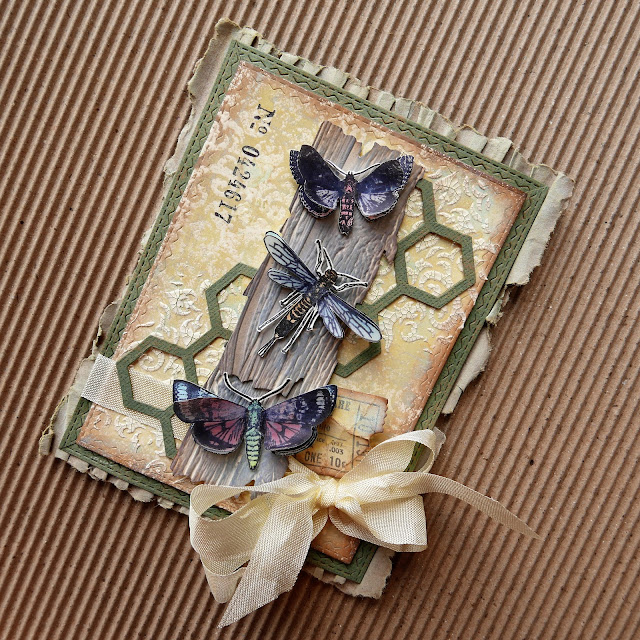
Entomology card

Hello,

Today I will show a card made with a lot of Tim Holtz products again.

For the background I used the Stitched rectangle die from Sizzix to cut out a piece from Distress heavystock and used crackle paste through one of Tim:s ministencils in some random areas. On some other random areas I used Distress resist spray through the same stencil. (Don,t forget to clean the stencil directly). Then I dipped and spritz the background in Old paper Distress Oxide. Repeated until I was happy with the result. Dried with a heat tool between the layers. Then I used Vintage photo Distress oxide around the edges to distress it.


I have used the Entomology stamp set CMS 328 from Stampers anonymous for the focal point on this card. I fuzzy cut the stamped images (I don,t have the die, yet), and coloured them with Distress ink,s in various colors. Then I stamped the same images on vellum papers and repeted the same steps. I have used that technique in an earlier project I have made, the Nature tag. I like it a lot because it give such dimension and "life" to the project.

I monted the stamped images on a piece of Distress media heavystock that was die cut with the Plank die som Sizzix and then I used the 3D embossingfolder Lumber. Great effect! I used Distress oxide in Hicory smoke and Stormy sky to color the "lumber". And distressed the edges with Distress Oxide in Vintage photo. Under the lumber I used the honeycomb die from Sizzix and cut it out in Coredinations kraft cardstock,


The ticket is stamped with the Ticket booth stampset CMS 337, and colored with DOX in Old paper and Vintage photo. I cut the ticker out with the coordinating die, so convinient!


The number is stamped in Archival ink Jet black, with the stampset Correspondence CMS 225, one of my favorite sets.

I like the crackled pattern from the stencil.


I mounted the card on some cardboard and used DOX Old paper on the edges. And finished the card off with a wrap and bow from seam binding band.

I will try this card in the following challenges:

Frilly and funkie , - All creatures great and small challenge
Stamps and stencils, Anything goes

Thank you so much for visiting, 

Have a nice day, 

/Susanne

måndag 17 september 2018

Birthdaycard for a friend

Hello and welcome, 

Today I will show a birthdaycard for a friend who turned 60 in June.

I have used paper from Prima, Engraver collection and the stamp are from Kenny K.


I have used dies from Magnolia, Sizzix Tim Holtz and Go Create. The stamp is colored with Distress reinkers and Distress inks.
The card is built with many layers to create dimension.


Thanks for visiting, 

Have a  nice day, 

/Susanne


tisdag 21 augusti 2018

Lucky card

Hello, and welcome.

It's been a while since I posted something on my blog. I have enjoyed the Swedish summer, with lots of sun and warm weather. And a lot of swimming to ;)

Now to my project, what suits better than a "Lucky" card?


I started with a piece of cardboard that I coloured with Distress crayon in Forest moss. The I cut two pieces of panels with the Stitched rectangles die from Sizzix, Tim Holtz.
The back panel is coloured with Distress Oxide in Peeled paint and Distress crayon in Forest moss. Then I stamped the lady bug random with black Archival ink.

The next panel is Distress Oxide Peeled paint and Distress crayon in Forest moss and then stamped with the small text background stamp from Tim Holtz, Stampers anonymous set Entomology CMS 328.

The small panel with the ladybug is Forest moss Distress oxide and then the same textstamp in black Archival ink.

The ladybug is coloured with Distress ink in Candied apple and with a clear embossing layer on top.

The Pennants and the text are from Tim´s stamp set Pennants CMS 330. I stamped the Pennants with Distress Oxide in Peeled paint on white card, and in Candied apple on black card. The text are stamped with black Archival ink.


Under the small panel I put some Peeled paint Oxide coloured cheesecloth, for some extra dimension.


As a decoration I put a string and a  Tim Holtz ideaology Story stick, which I put som white Distress crayon on to accentuate the word Lucky.
I also put on an ideaology star, and two small diecut stars from one of Tims dies.

I mounted my panels on to a black card base.


I will try this card in this challenge:

Craft Stamper - TIMI challenge, August, Anything goes.

Thanks a lot for visiting,

/Susanne