Blogg

Blogg

söndag 26 juni 2022

”60”

Hello and welcome, 

Have you seen the inspirational live or replay by Tim Holtz when he released new stamps and stencils with Stampers anonymous a couple of weeks ago? If not, you are in for a real treat. Here is the link for the release blogpost over on Tim’s site. I was so inspired by Igirlzoe’s make Eccentric and Emma Williams “91” card and I love numbers so I decided to make a card for a collegue who will turn 60 in July. 

I cut 2 tags from White heavystock with 657859 Tag & tie die. (These tags are available to by precut from Ranger now.) I inked Frayed burlap Distress ink on my craft mat and spritzed some water, then dipped the tag and heat dried with my heat tool. Repeat until happy with the result. Then I used the new Freight stencils and Micro glaze applied with my ink blending tool through the stencils. Then I inked my craft mat with Distress ink in Ground espresso and Rusty hinge, dipped the tag, spritzed some water on the tag and then sprayed some Distress Oxide spray in Walnut stain. Heat dry. Then I sprayed a some more water on the tags. 


I used my splatter brush and some Distress paint in Salved patina over the tags as well. Inked the edges with Distress ink Ground espresso, and stamped some images from CMS448 Eccentric with Black soot Archival ink. Then I used my sewing machine and stitched around the edges. 

For the background of the card I cut a piece of White heavystock and inked my craft mat with Frayed burlap Distress ink and sprayed some water. Then I dipped my card in the ink and heat dried. Repeated until happy with the result. Then I used the new CMS449 Bubbles and Frayed Burlap Distress ink and stamped on the background. This is such a cool stamp, useful in so many ways. 

I stamped the “For skill…..” stamp from CMS448 Eccentric with Barn door Distress oxide and then with Archival ink in Black soot (a technique Emma W used on an earlier project), using my stamp platform. The bullseye is stamped from CMS432 Inquisitive with the same technique. 

The “Guaranteed to be …” stamp is stamped with Archival ink Black soot and colored with Distress ink in Candied apple and Frayed burlap. As you can see I used my sewing machine and stitched around the edges. I made some splatters on the background with Rusty hinge Spray stains.

The pointy finger is stamped on water color paper and then colored with Distress reinker and Distress inks. Inked edges with Ground espresso DI, and fuzzy cut. Adhered with a Hex fastener and 3D foam. 

The tags are stitched to the background with red thread with my sewing machine. I “linked them together” with a Ideaology Swivel clasp, Loop pin and a Jump ring. I sanded the edges on a small talk sticker and mounted it to the tag with 3D foam. 

I fastened a Mini marquee letter “H” (my colleague’s name starts with an H), with my Tiny attacher. 

Up in the right corner I glued an Adornment star which I have painted with red acrylic paint, sanded and then put on some Alcohol ink in Mushroom for that aged effect. 

I mounted the card with 3D foam on a piece of sanded Kraftstock and then on an inked cardboard piece, finally to a black card blank. 

I will try this card in a challenge over at Simon says stamp Monday challenge - Something beginning with ‘S’. For this card the S are, Stamps, Stencils and a Star. 

Thank you very much for visiting today, take care,

/ Susanne

lördag 25 juni 2022

Uncharted Mariner

Hello and welcome, 

I really hope you have seen the new Beautiful Distress color, Uncharted Mariner. A fabulous blue with so many hues in it. 

My first project with this blue color is this tag, made with Tim Holtz products, (accept from the Crackle glaze, which is from Deco art.)


I started to cut the tag from Distress white heavystock stock with my tag die. I put some Frayed burlap Distress ink on my craft mat and spritzed some water. Dipped the tag a couple of times in the ink, dried between layers until happy. Then I inked up the new Tim Holtz CMS449 Bubbles stamp. I lightly sprayed some water on the stamp and then stamped it over the entire tag. Heat with heat tool. 
Inked the edges with Ground espresso Distress ink and put a quite thick layer of Deco art Crackle glaze over the whole tag. Let it air dry. Then I used Distress crayon over most of the tag and “smeared” it with my fingers so it went down in the crackles. (Ranger/Tim. Holtz have also Crackle glaze in their assortment now, but I want to use up what I already have before buying a new jar). 

For the window and propeller I die cut chip board and Platinum Metallic Kraftstock with 664185 Steampunk parts die from Sizzix. Then I glued the metallic pieces to the chip bord pieces.  Then I sanded all the edges and inked all them with Ground espresso Distress ink.
I added Translucent grit paste on random places and let dry. Then I put Distress crayon in Walnut Stain over the dried paste and used y Water brush to even out the crayon. Then I did the same with some Distress crayon in Rusty hinge (a little less of that color). I love this look of the Metallic parts, it looks so old and worn.
Now it is time to mount all the metallic pieces together. I cut a circle shaped piece from Mica tiles as the window, and glued it between the thin circle and the wider circle piece. Very cool look with the Mica! I have used Distress Collage medium for all the glueing on this tag. 


I stamped the text “Go see explore” with CMS394 Tiny text and Archival ink Ground espresso on some White heavystock which I have inked the same way as I started the tag. Inked the edges with Distress ink Ground espresso and next put a layer of Crackle glaze. Let air dry and crackle. Then I smeared some Distress Crayon in Walnut Stain over the crackle. I fastened the “label” to the tag with Mini fasteners. In the window I placed a photo from Photo booth, I think this young man looks like a real sailor or marine. I also glued two “washers” at the top of the tag. I colored some Mummy cloth with Distress ink Uncharted Mariner and some Frayed Burlap, and tied it through the hole on the tag. 


Behind the window I placed some Frayed Burlap inked Cheese cloth. 


In the down left corner I placed a Ephemera Number strip, which I inked the edges with Distress ink in Ground espresso and put some Crackle glaze on. Then I smeared some Distress crayon in Walnut Stain over the yummy crackles. 


On the right side of the propeller I glued two real seashells which I have inked a little with Distress ink Ground espresso. 


I will try this tag over at Simon says stamp Monday challenge - Something beginning with ‘S’, where I have used the Sailor, Sea shells and the Stamped background. 

I hope you will try this new Distress color! 

Thank you very much for visiting my blog, 

/ Susanne 


söndag 19 juni 2022

Mickey card

Hello and welcome, 

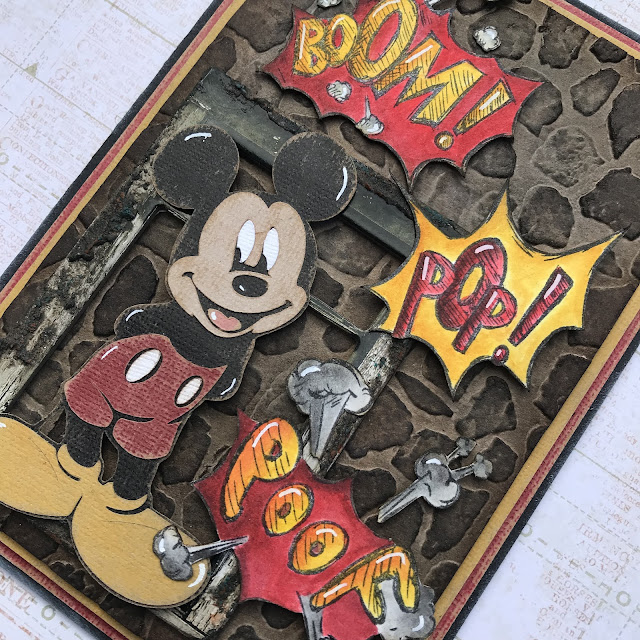
Just popping in and share a card that I made for my husband’s birthday this year. We are Disney fans so I thought a Mickey card would be nice. 

I cut Mickey out with my Cricut and used sanded Kraft cardstock. For the rest of the card I used Tim Holtz products. 


I started with the background, cut a piece of Distress Kraft cardstock and used the 3D folder Cobblestone #2. I used some Archival in in Hickory smoke in the folder. Then I inked the background with Ground espresso and Black soot Distress ink. Finally some more Archival ink in Hickory some and Ground espresso. I also inked the edges with Distress ink Ground espresso. 


I wanted this card to be like a comic strip, so I inked up the CMS238 Crazy thoughts, colored them with Distress inks and fuzzy cut. Inked all the edges with Distress ink in Ground espresso.


I highlighted both Mickey and the stamped images with a white Posca pen. 


I placed Mickey over a Ideaology Window frame, which I have sanded. After that I put some Translucent grit paste in random places around the frame, let dry and then applied some Distress crayon in Walnut Stain. 


Then I cut pieces from Kraftstock in red and yellow, sanded the edges and mounted the card onto them. Finally I mounted the card to a black card blank. I used 3D foam between the layers for dimension. 


I will try this card in a challenge over at Simon says stamp Monday challenge - Frame it.

Thank you very much for visiting my blog, 

/ Susanne


fredag 10 juni 2022

Tag card

Hello and welcome, 

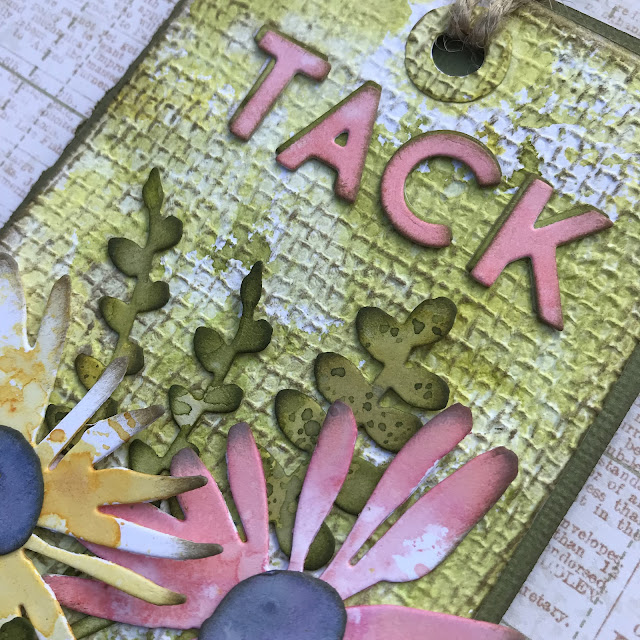
I have made this ”tag-card” for a girl who have moved to Sweden from Los Angeles. She is a skin therapist and have started a beauty salon in my hometown. She really put’s her soul in every treatment/customer, so I wanted to thank her with some flowers and this card. 
This card is made from some of Tim Holtz chapter 2 dies. 

I die cut a tag from Distress White heavystock, put some Distress inks on my craft mat, sprayed some water and “dipped” the tag. I used different colors of green. Dried with my heat tool between layers until satisfied. Then I used the new Woven 3D embossing folder, for some great texture. I then used Distress ink Frayed burlap directly on to the surface, to hit the raised areas of the background. Also inked the edges of the tag. 


I inked some White heavystock with green Distress and some with Saltwater taffy. Then I die cut the word “Tack” which means Thank you in Swedish, with 665205 Alphanumeric bold. Inked the edges and glued the letters together a little bit offset. 


I love the texture from this 3D folder.


Up next was to die cut the flowers from White heavystock with 665853 Modern floristry, and then inked them. (Mix of Distress inks and Oxides). I sprayed some water on them and also inked the edges.

This is a very versatile die.

When I have glued the flowers to the tag I cut a card base from green cardstock and mounted the tag with 3D foam pads for dimension. I also inked the edges on the card base. Finally I put a piece of string in the hole of the tag. 

I will try this card over at Simon says stamp Monday challenge - Bright and cheerful. 

Have a nice weekend and take care.

As always, Thanks for visiting. 

/Susanne